How QR Codes Work
qr-verbose library.
I originally wanted to write about Reed–Solomon codes with an illustration based on how QR codes work. While preparing the article, I built a tool to simplify visualization and realized I already had enough material missing on Habr, so I changed the plan. If you don’t want to read, the QR in the cover image was generated with qr-verbose.
pip install qr-verboseDocumentation (English)
There are many posts about QR codes on Habr — for example, one of the most popular articles of all time is “Reading a QR code” — and there are plenty of translated articles as well. Unfortunately, they have something in common: if you try to read version 4+ codes (and some version 3 codes) by following those descriptions, you’ll fail. Don’t believe it? Try decoding the QR from the cover image below.
In this post I’ll recap how a QR code is structured and what problems start with version 3, and I hope qr-verbose will help those who still haven’t figured it out.
Reading a QR code, again
So, take a QR code.
qr-verbose -m 0 -v 3 \
    -t regular \
    -e M \
    -o a_zachem_regular.png \
    t.me/a_zachem_eto_nuzhno
First, determine metadata.
qr-verbose -m 0 -v 3 \
    -t color \
    -e M \
    -o a_zachem_colors.png \
    t.me/a_zachem_eto_nuzhno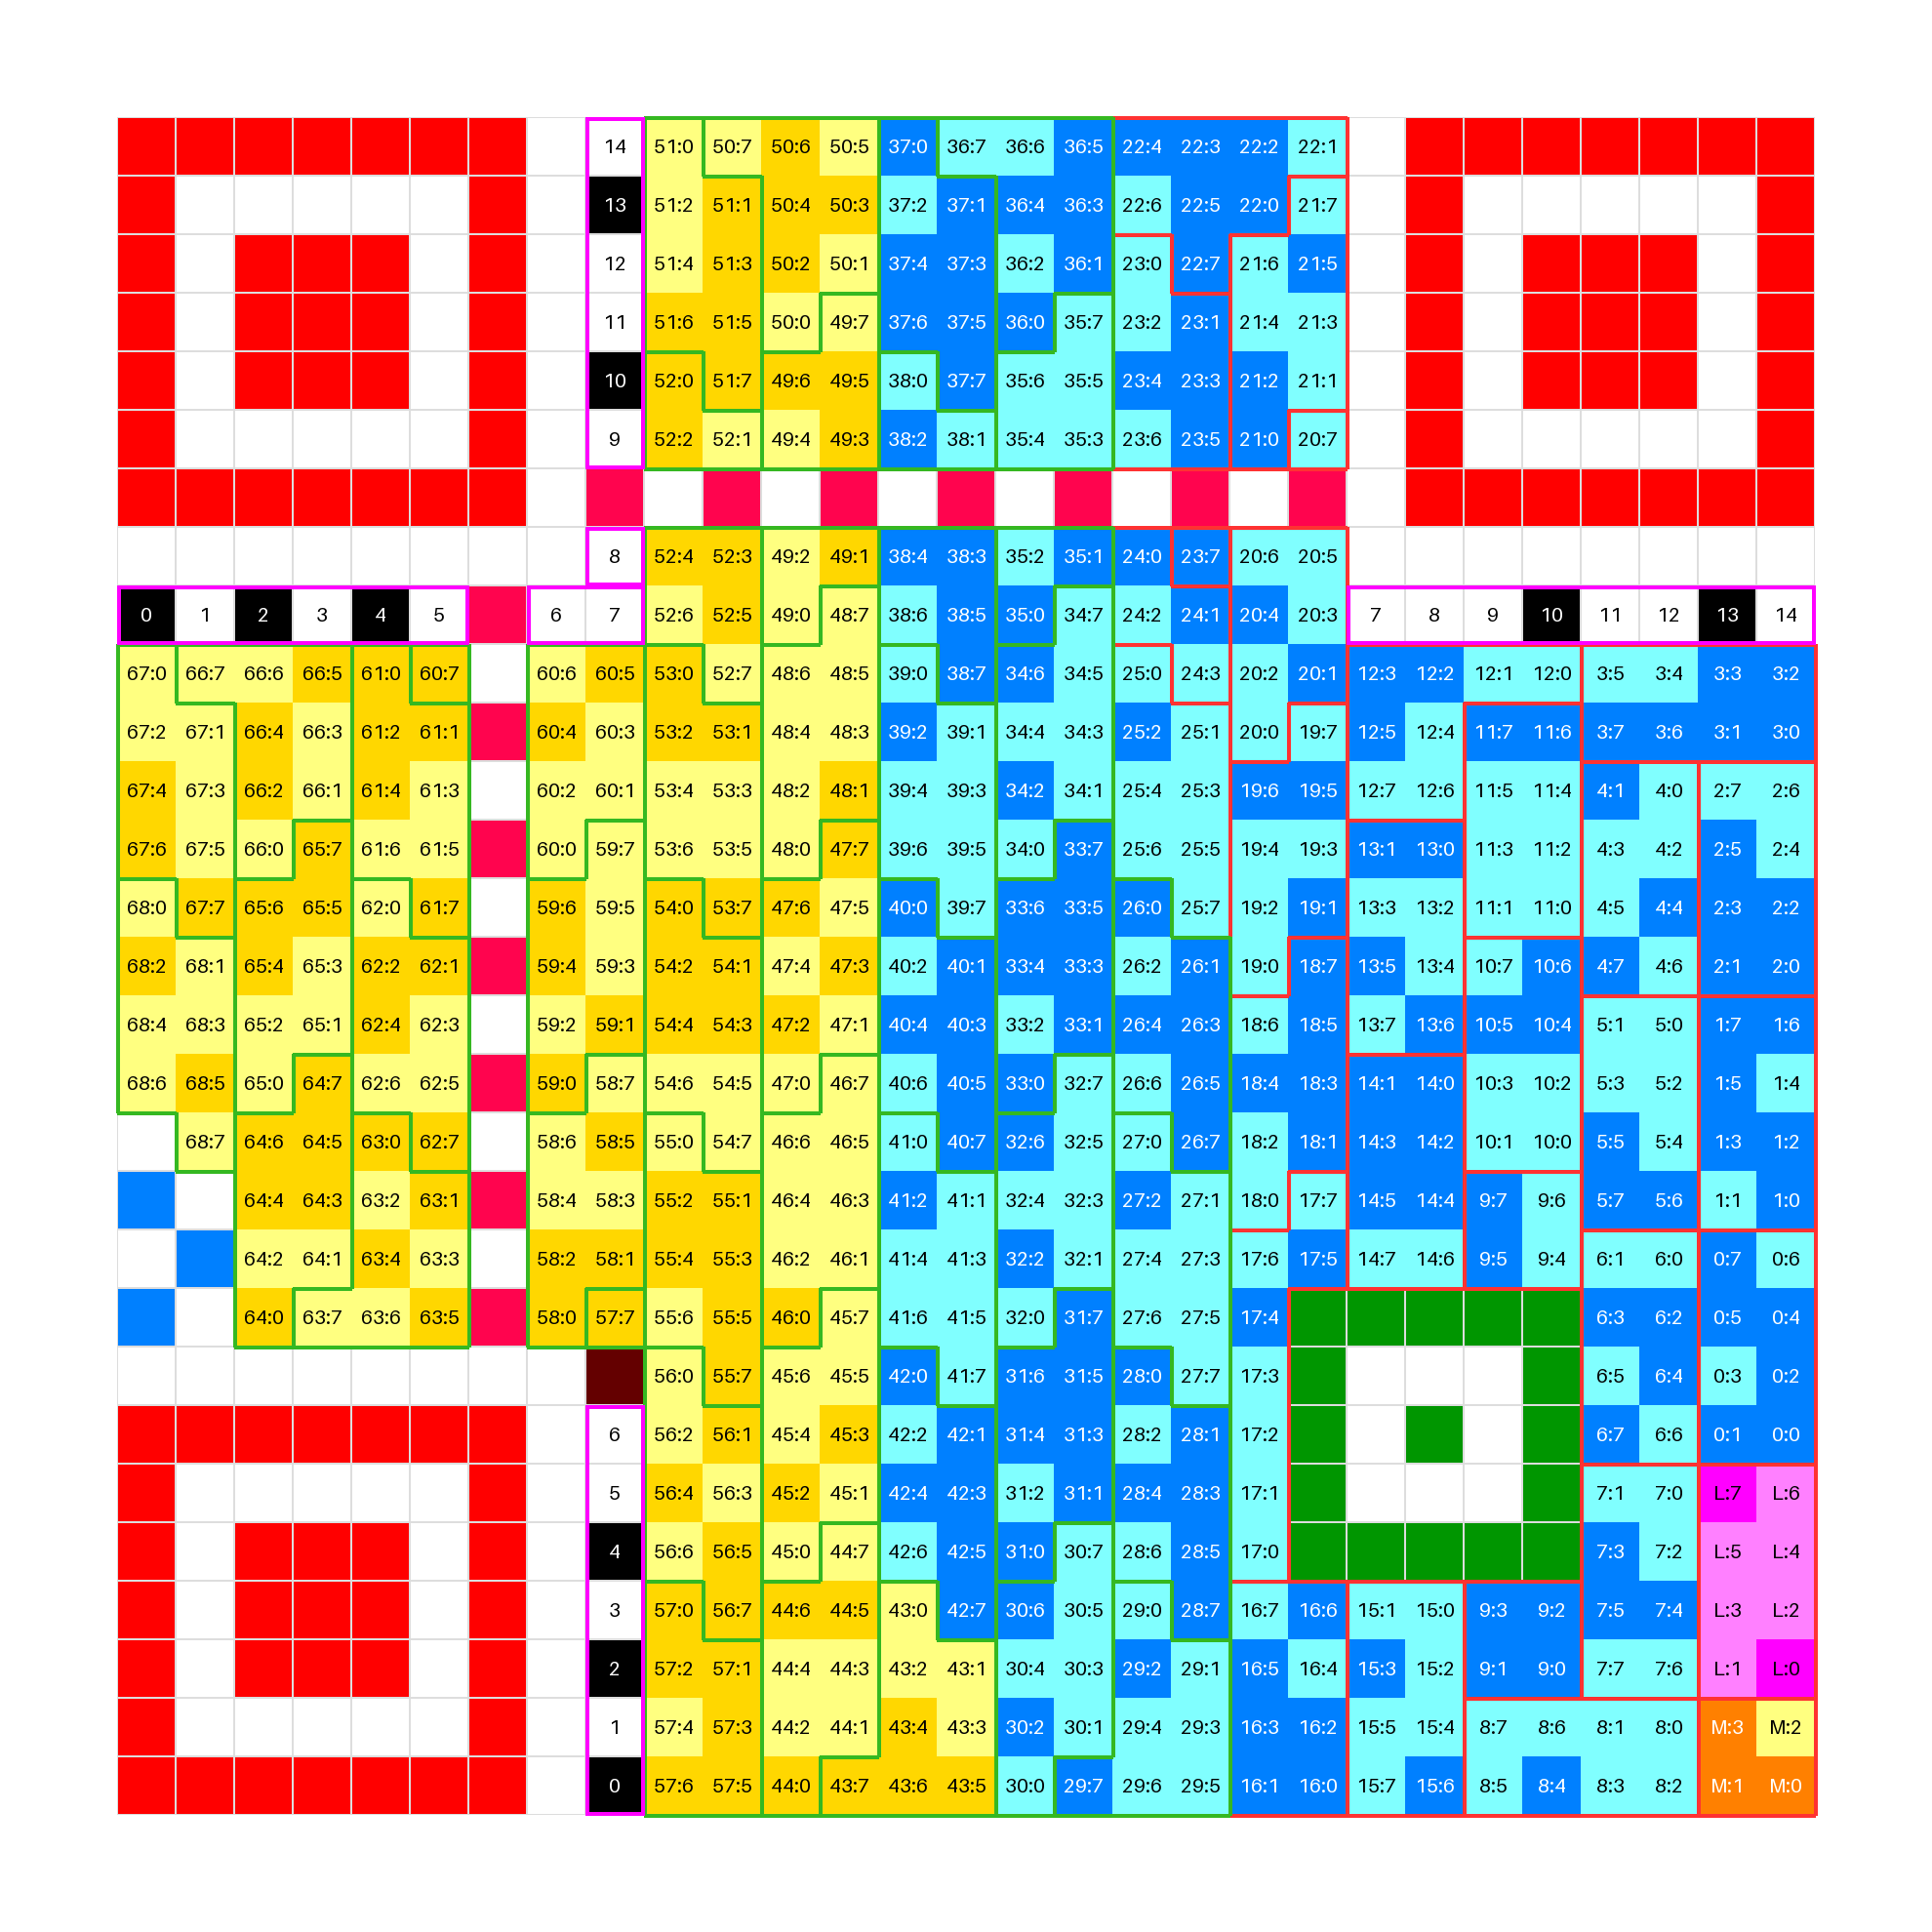
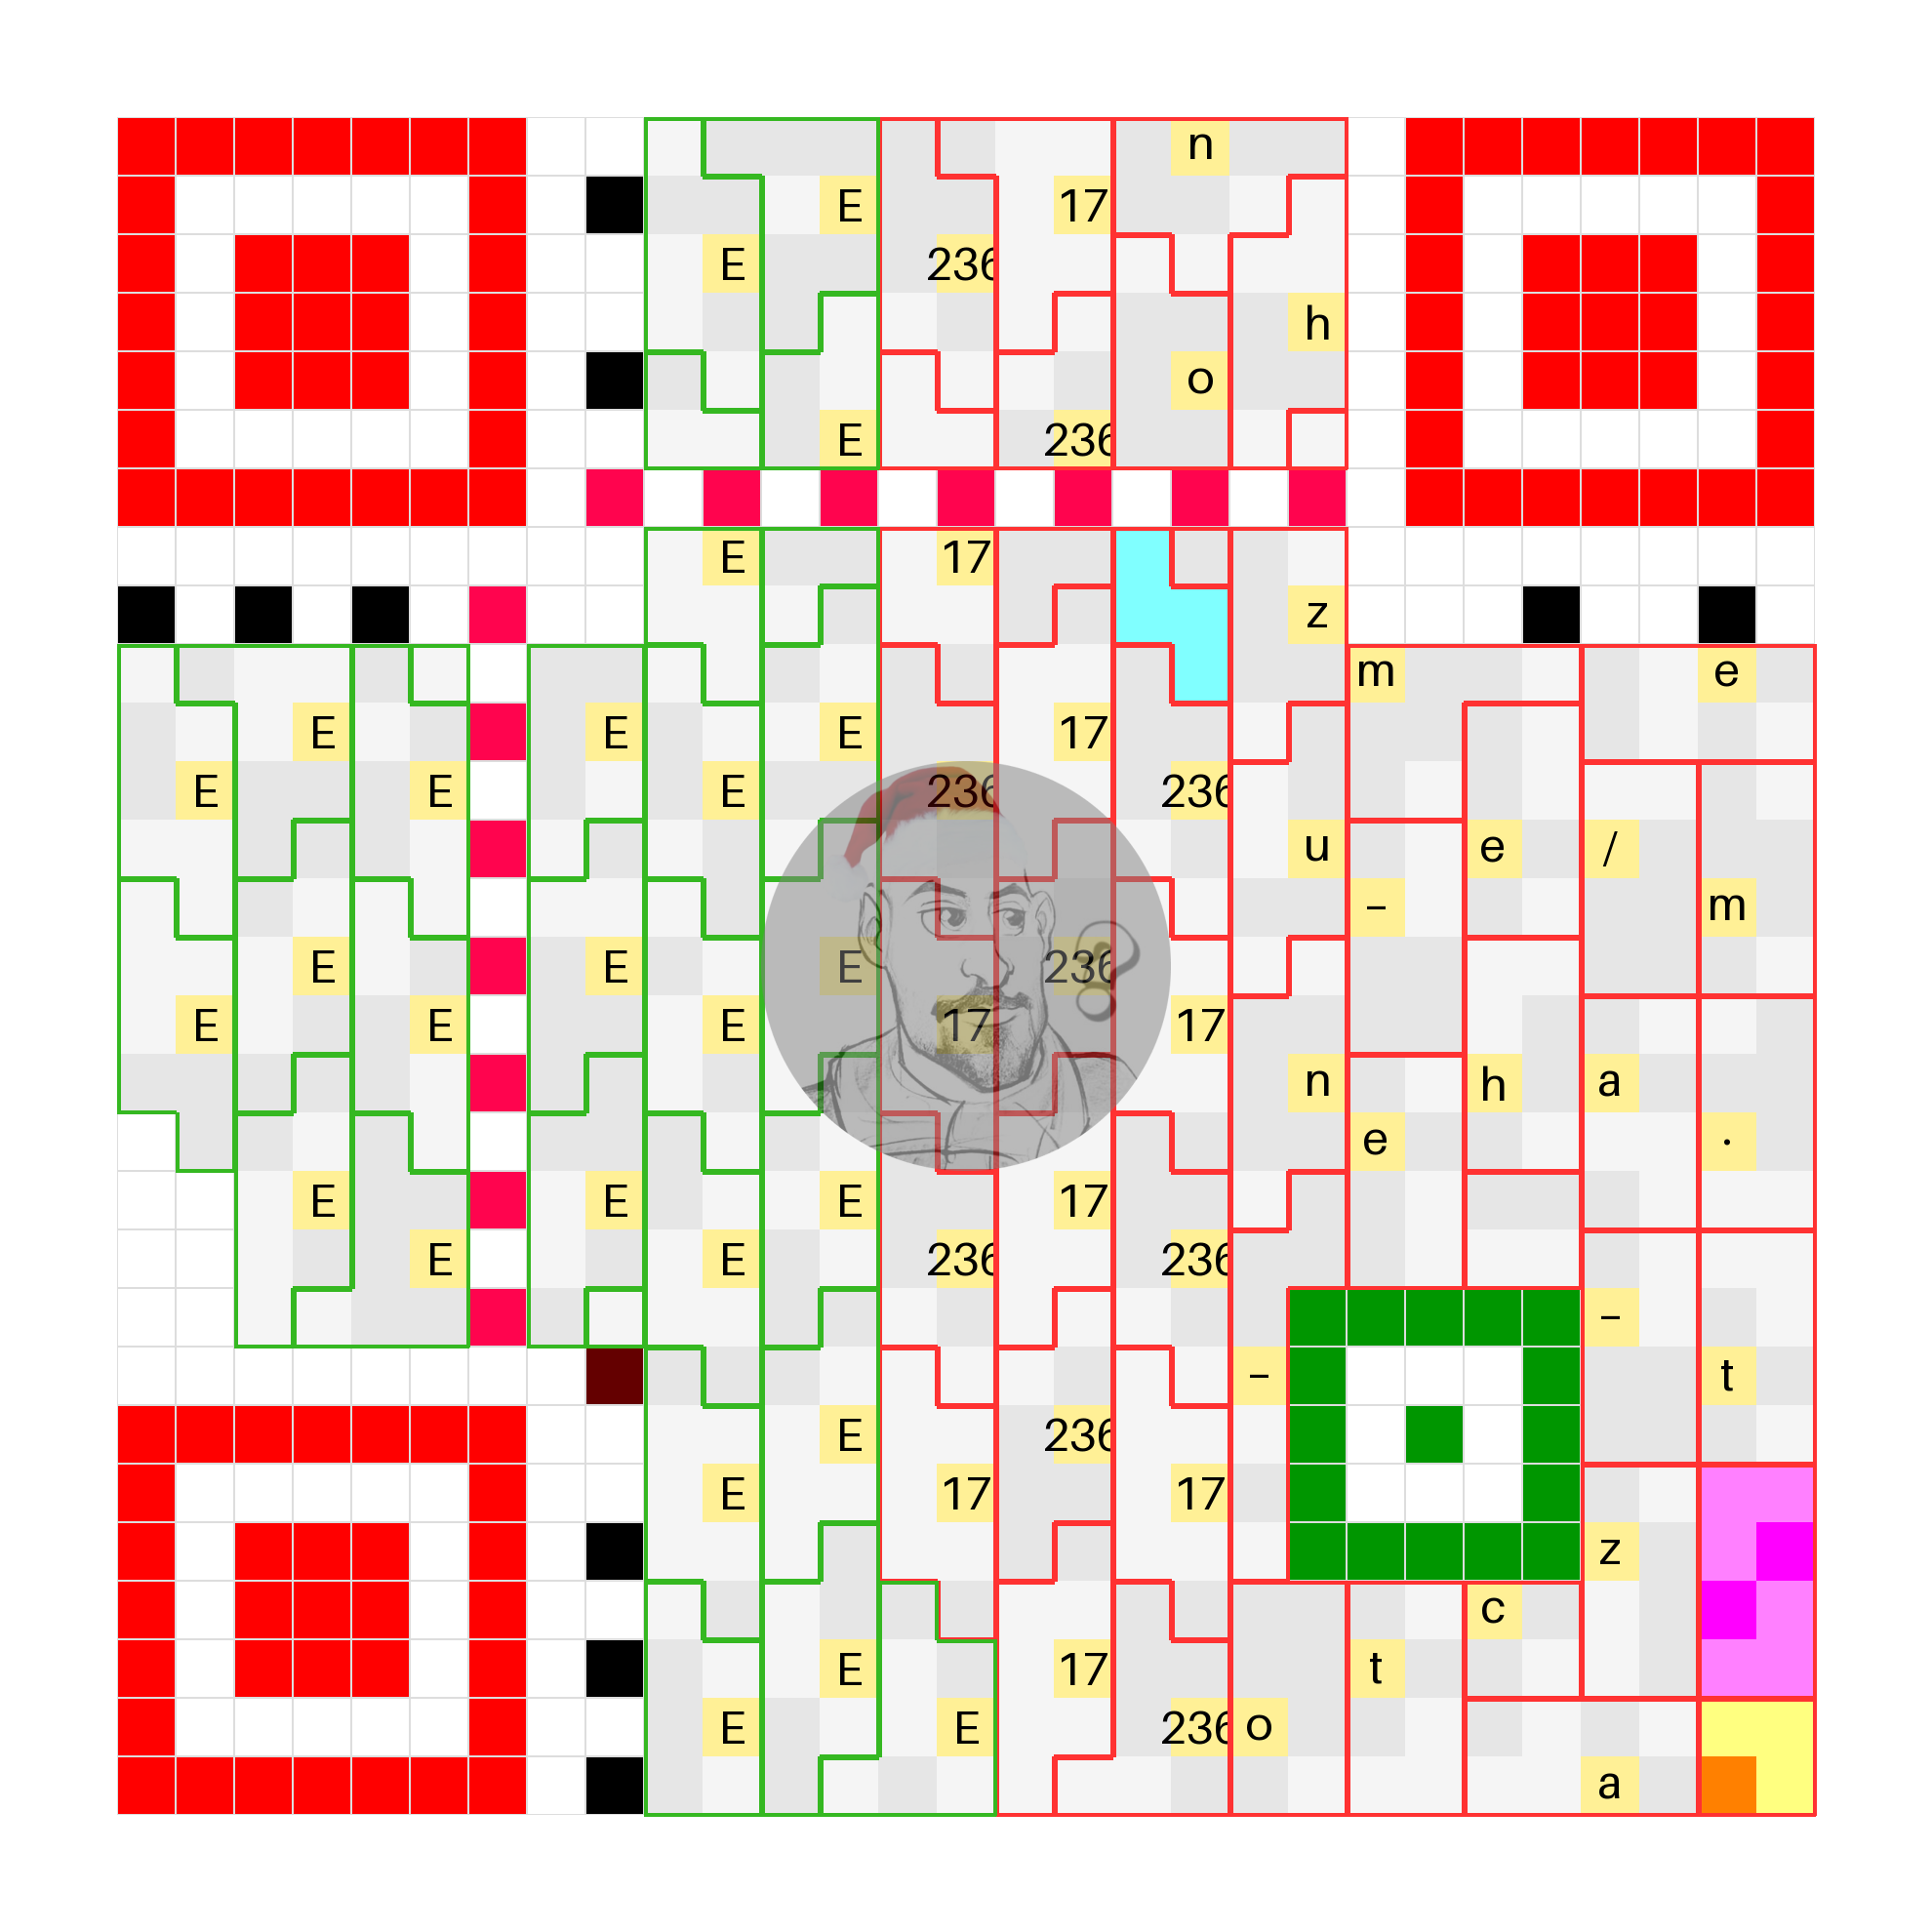
So, what matters here:
- 3 large red squares — the finder pattern; these squares are always framed by a white border.
- Black-and-white stripes framed in purple — information about the error-correction level and data mask. There are 4 levels: L (~7%), M (~15%), Q (~25%), H (~30%); the percentage is the share of errors that can be corrected. The number of correction symbols is twice the indicated share. The mask is one of 8 data-flip patterns, used to exclude patterns that confuse scanners. The first 2 bits encode the correction level (01-L, 00-M, 11-Q, 10-H). Here it’s M. Bits 2–4 specify the mask; the remaining 10 bits are BCH(15, 5) correction bits. Finally, these 15 bits are XORed with the standard constant
10101 00000 10010, and the resulting bits are written; all 15 bits are duplicated, with indices shown. - The horizontal and vertical stripes with alternating reddish-violet bits connecting the large squares are the timing pattern, used to determine the code size; these stripes have no bit indices.
- The green square is the alignment pattern; it also helps scanning.
- The orange 4-bit square in the bottom-right is the start of data. The mask is applied to it and it participates in error-correction blocks like all subsequent data. These 4 bits store the data mode. Here it’s the default — byte mode.
- The following purple 8-bit block stores the encoded message length; like the mode info, it is masked and participates in the error-correction blocks.
- The remaining QR area is split into 8-bit blocks (except one 4-bit block) forming bytes. Blue bytes are data, yellow bytes are error correction. Data blocks with a red border are real data; green borders are padding.
Inside each byte there is a label in the form
Next, let’s remove the mask.
qr-verbose -m -1 -v 3 \
    -t color \
    -e M \
    -o a_zachem_colors.png \
    t.me/a_zachem_eto_nuzhno
Note that the remaining 7 bits to the left above the bottom red square are now zeros. The encoding mode 0100 corresponds to byte encoding, the length is 24 (note that 0 corresponds to the most significant bit, but for 24 it doesn’t matter), and the 24th block contains 4 zero bits — the standard terminator. After it come padding bytes of one of two values: 17 or 236. Here’s a clearer ASCII view; I also add a logo so it’s visible which bytes it covers (yes, the logo literally covers bytes — the QR can still be scanned thanks to Reed–Solomon redundancy, though that’s not what it was intended for).
What changes starting with version 3
Let’s take the QR from the cover image and do the same steps.
qr-verbose -m -1 -v 3 \
    -t ascii \
    -e Q \
    -o misterious_ascii.png \
    "Happy new year, Habr!"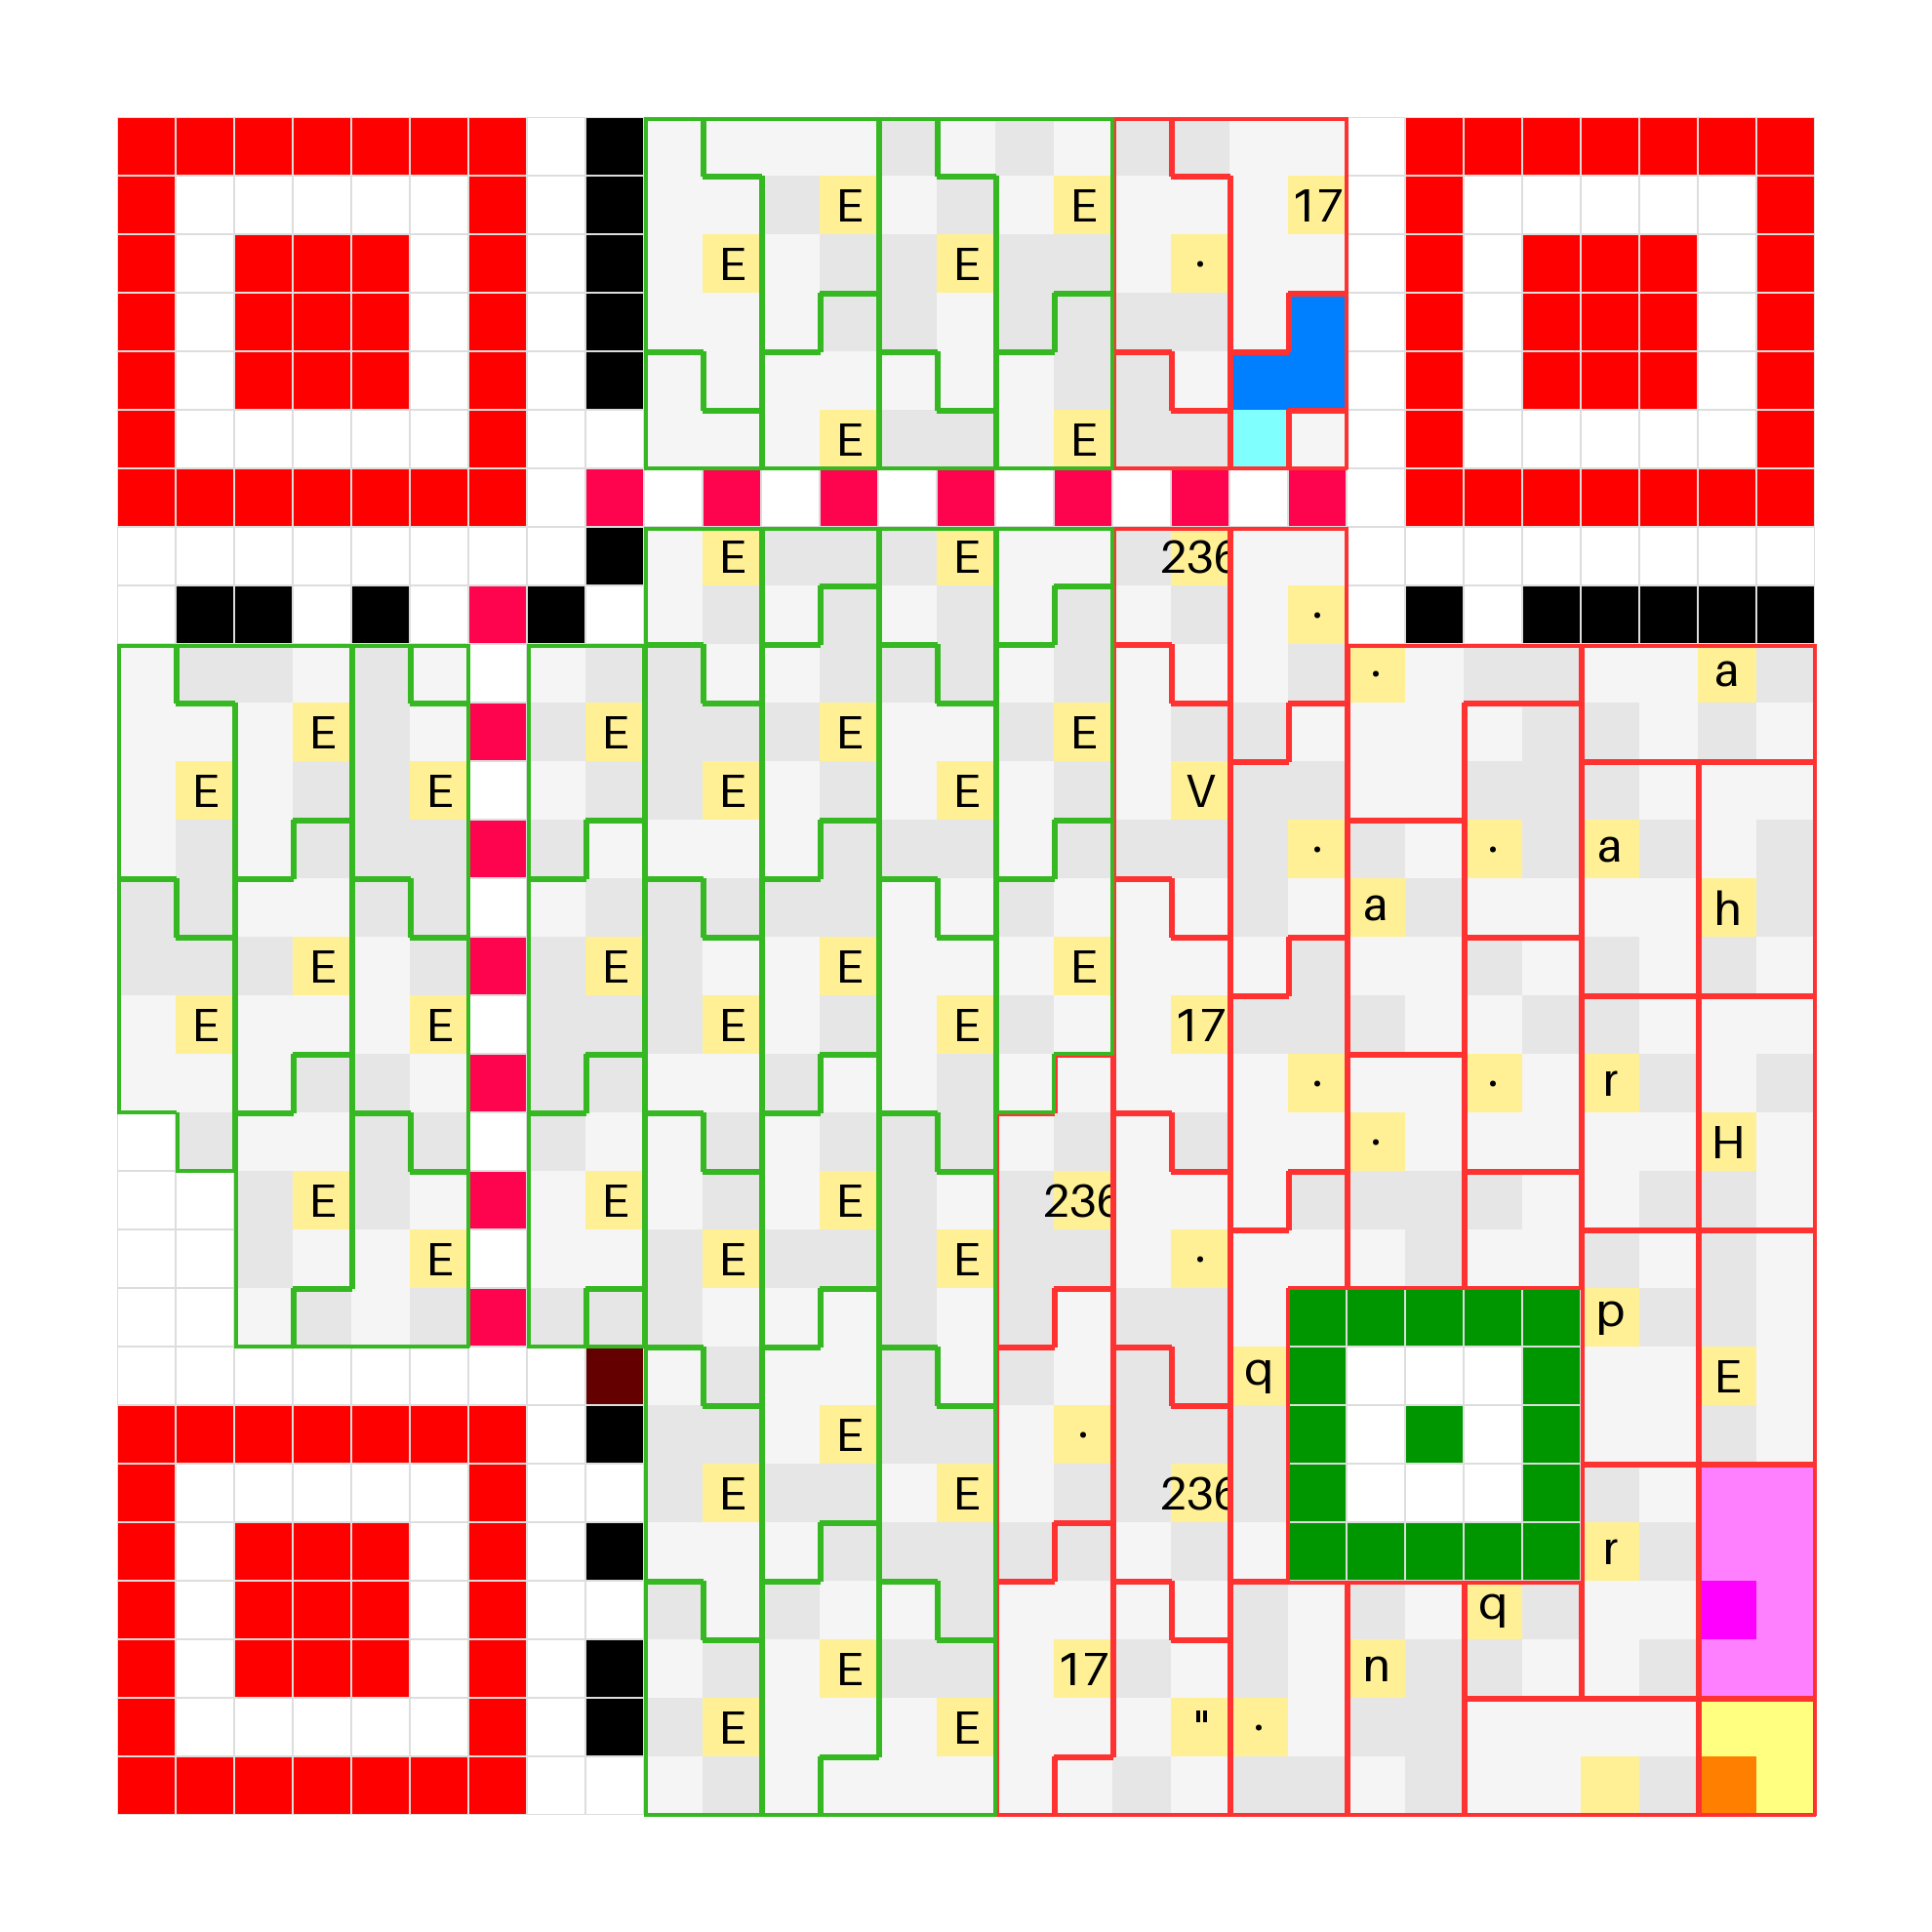
How so? Previously there was meaningful information: a feeble attempt to sneak in a personal blog ad, and now it’s just gibberish. The problem appears at the Reed–Solomon construction stage — more precisely, during data splitting and placement. The key point is that, like BCH(15, 5), QR uses systematic encoding for Reed–Solomon: the original message is part of the encoded message. That’s why in the earlier case we could read the message by ignoring the extra bytes. Reed–Solomon codes limit the data block size: for a field \(\mathbb{F}_q\), the block cannot exceed \(q\). In QR codes, Reed–Solomon works over \(\mathbb{F}_{256}\) — the most practical choice — which caps the block size at 256 elements. The solution is simple: data forms multiple correction blocks, and the first time two blocks appear is in version 3 with correction level Q. At this stage, you already need to understand how encoding works, at least the part about splitting data.
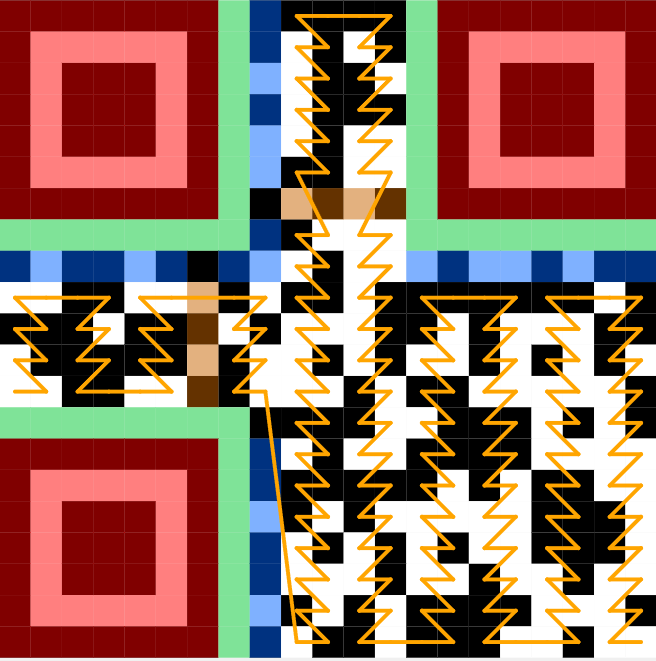
First, encoding does not operate on the original bytes of the message; instead, they are re-sliced into bytes starting from the mode bits and ending with the terminator. The next image shows how it works.
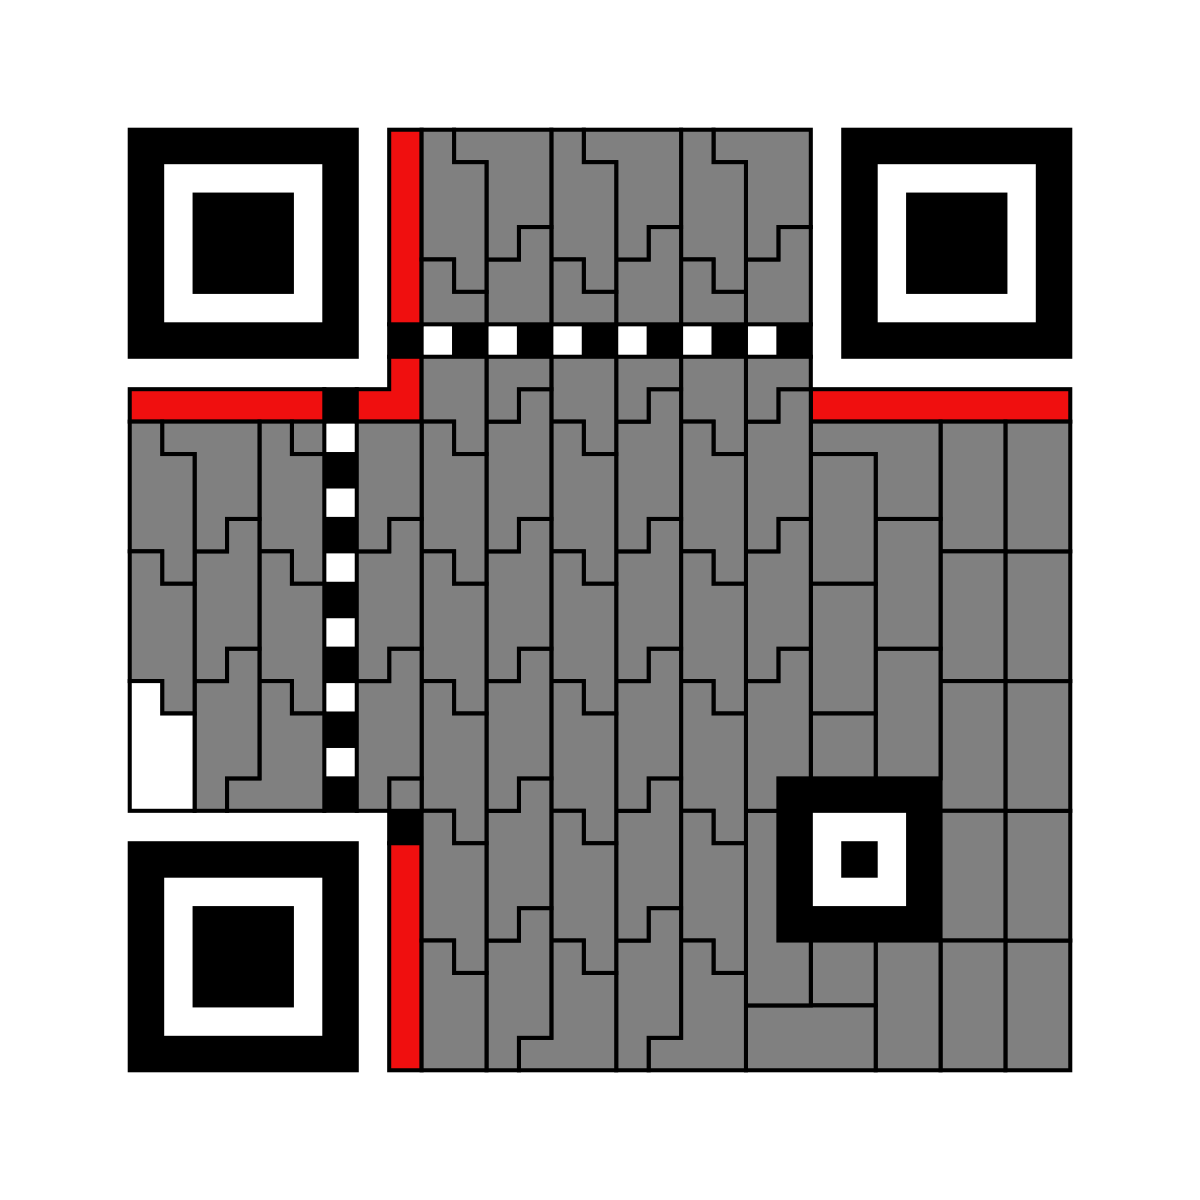
In essence, most bytes in the redundancy consist of two halves of bytes from the real data. The final touch is another error-protection mechanism — interleaving. It’s a standard technique for protection against several consecutive errors: data from different blocks is mixed, reducing the probability that all losses fall into a single block. In QR codes, block interleaving is simple: first bytes of blocks go in order, then second bytes in the same order, and so on. A great illustration is in the article Breaking Bitcoin on TV: obfuscate or not, you still get the QR:
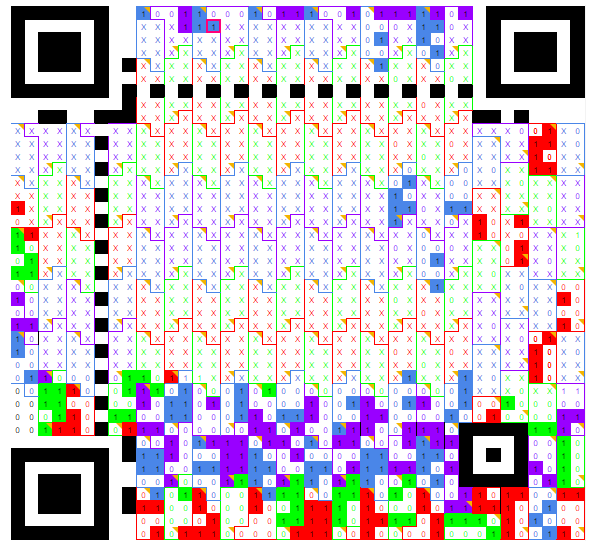
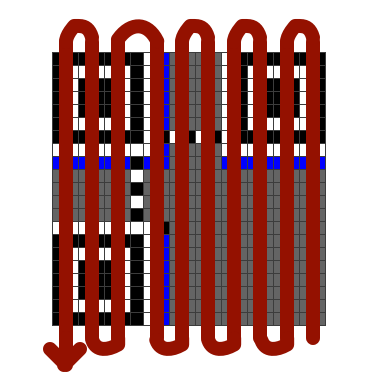
When you combine this with the fact that redundancy bytes contain information about two data bytes, you get that they are spread across different areas; as a result, reading the data becomes harder. The next image shows how symbols are actually laid out in the code above.
That’s it — thanks for reading, and Happy New Year!